
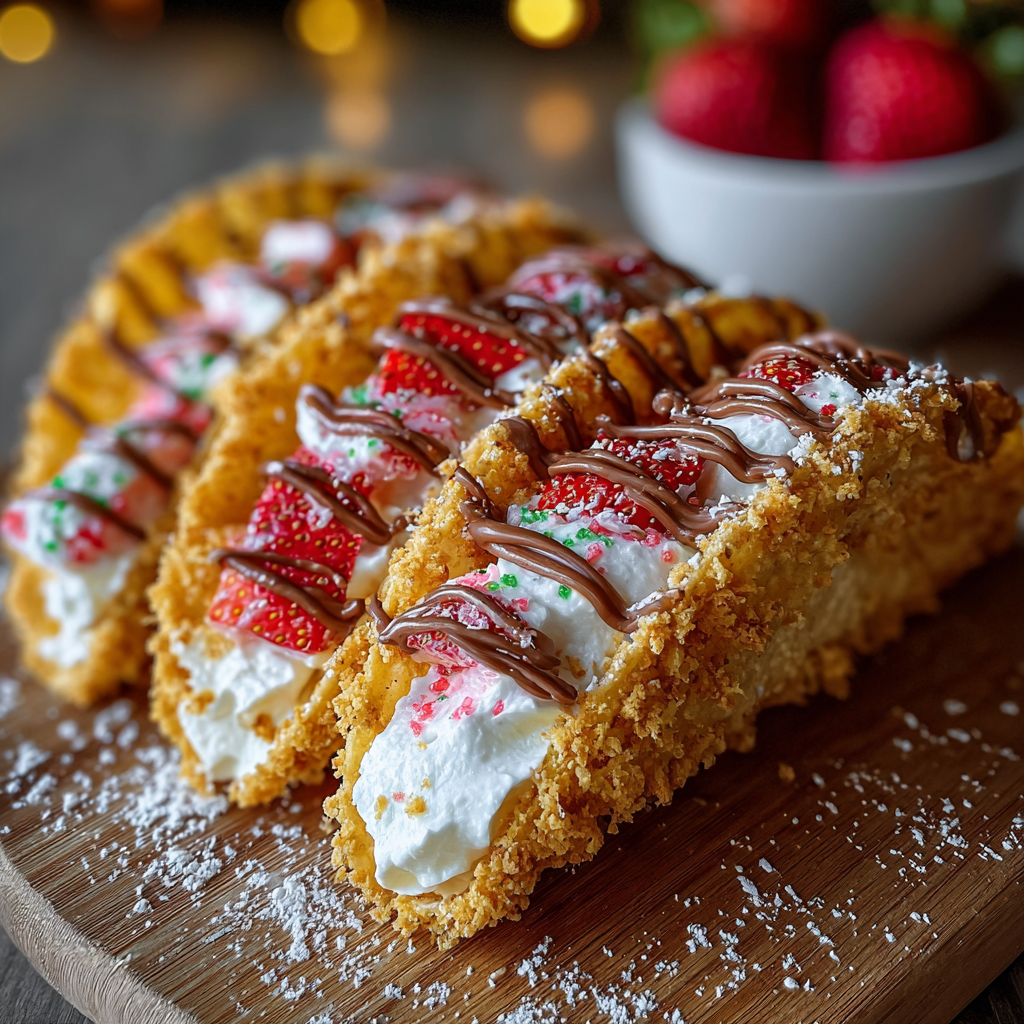
Cheesecake Tacos

A playful holiday dessert: crisp white-chocolate-coated tortilla shells filled with airy cheesecake, rolled in graham crumbs and festive sprinkles — perfect for parties and make-ahead celebrations.

This playful cheesecake taco is a festive dessert I first invented one holiday season when I wanted something portable, colorful, and quick to serve at a family cookie swap. I grew up watching my grandmother turn simple pantry staples into something extraordinary, and these dessert tacos feel like that tradition updated: crunchy white chocolate shells, buttery graham crumbs, and a whipped cream cheese filling that’s light but still indulgent. They travel well, look charming on a platter, and are surprisingly simple to assemble.
I discovered the combination during a particularly busy December when I had tortillas, white chocolate, and a jar of sprinkles on hand. The first batch was an experiment — shaping flour tortillas into taco shells using an upside-down muffin tin — and the result was an immediate hit. The contrast of textures is what sold everyone: the cookie-like shell that snaps, the creamy filling that melts on the tongue, and the sparkle of crushed candy canes and M&M’s on top. These have become my go-to for holiday open houses and kids’ parties because they’re colorful, make-ahead friendly, and endlessly adaptable.
Why You'll Love This Recipe
- Party-ready and portable: each portion is handheld, so guests can grab a taco and keep mingling without plates and forks getting in the way.
- Fast to bake and quick to assemble: shells bake in about 5–6 minutes and the filling whips up in under 10, so you can finish a batch in less than an hour.
- Uses pantry staples: flour tortillas, white chocolate, graham crumbs, and basic baking supplies — no specialty ingredients required.
- Make-ahead convenience: shells and filling can be prepared a day ahead and assembled just before serving to maintain the crunch.
- Crowd-pleasing visuals: festive sprinkles and crushed candy canes make these great for holiday parties and kid-friendly events.
- Customizable toppings: switch out candy for fresh fruit, nuts, or caramel for different occasions.
I still remember the first time I brought these to a family gathering — my niece insisted on making a taller stack than anyone else and declared them the best dessert ever. The clean-up was minimal and people loved that each taco felt like a small, celebratory bite. Over the years I’ve tweaked the crunch-to-cream ratio and the coating technique so they look polished without a lot of fuss.
Ingredients
- Large flour tortillas (5): Look for burrito-size tortillas (10–12 inch) rather than small taco shells so you get three circles per tortilla when cutting with a 4-inch cutter. Thicker tortillas hold their shape best when molded in the tin.
- Unsalted butter (1 tablespoon): Melted and brushed on the cut tortilla rounds to encourage even browning and a faint buttery flavor. Use a high-quality stick butter for best flavor.
- White chocolate (13 ounces), chopped: Use couverture or a good-quality baking chocolate that melts smoothly. Avoid chips labeled for baking that include stabilizers if possible; they can be grainy when melted.
- Graham cracker crumbs (1 cup): Fine crumbs adhere to the white chocolate and provide the classic cheesecake crust flavor. If you prefer, use chocolate graham crumbs for a deeper contrast.
- Christmas sprinkles (1/4 cup): Adds color and texture; choose larger nonpareils or jimmies so they show on the outer shell.
- Crushed candy canes (2 tablespoons): Provides a bright peppermint crunch that pairs beautifully with white chocolate. Crush coarsely for texture.
- Cream cheese (12 ounces), softened: Full-fat cream cheese yields the creamiest filling. Leave it at room temperature for at least 30 minutes before whipping to avoid lumps.
- Powdered sugar (2/3 cup): Fine sugar dissolves smoothly into the cream cheese for a silky filling without grit.
- Vanilla extract (1 tablespoon): Pure vanilla rounds out the flavor; steer clear of imitation for best aroma.
- Heavy whipping cream (1 cup): Whipped into the filling to lighten it and give that airy, mousse-like texture typical of no-bake cheesecakes.
- M&M’s or small candies (optional): For an extra festive garnish and a bit of color contrast.
Instructions
Preheat and prepare the tin: Preheat the oven to 350°F (176°C). Turn a standard muffin tin upside down on a baking sheet so the tops of the cups create domes; this upside-down method is key for forming taco-shaped shells from tortilla circles. Line a separate baking sheet with parchment for later. Working with a cool, flat work surface helps keep the tortillas from stretching. Cut and brush the tortillas: Use a 4-inch round cookie cutter and press firmly to cut approximately three circles from each large tortilla. Brush both sides of each circle lightly with melted butter — this helps them brown evenly and crisp. If you don’t have a cutter, a wide drinking glass works in a pinch. Mold and bake the shells: Place the buttered rounds over the reversed muffin tin domes, tucking them gently so they form a taco-shell curve. Bake for 5–6 minutes, watching for the edges to turn a light golden brown. Remove from oven and leave on the tin to cool; the shells will crisp as they cool and hold their shape better if left undisturbed. Prepare the coating: In a shallow bowl combine graham cracker crumbs, 1/4 cup sprinkles, and crushed candy canes. Melt the chopped white chocolate over a double boiler or in the microwave in 20–30 second bursts, stirring between bursts to avoid scorching. You want it smooth and fluid but not hot. Coat the shells: Brush the inside and outer rim of each cooled shell with melted white chocolate and immediately roll or press into the graham mixture so the coating adheres before the chocolate sets. Place coated shells on the parchment-lined baking sheet and refrigerate for about 10–15 minutes until the chocolate is fully set and firm to the touch. Whip the filling: Using an electric mixer, beat the room-temperature cream cheese with powdered sugar and vanilla until completely smooth. In a separate bowl whip the heavy cream to soft peaks, then fold the whipped cream gently into the cream cheese mixture until light and airy. Taste and adjust sweetness if desired. Pipe and garnish: Transfer the filling to a piping bag fitted with a wide round tip and pipe generous portions into each chilled shell. Finish with extra sprinkles, crushed candy canes, and a few M&M’s for color. Chill the filled tacos in the refrigerator for at least 30 minutes before serving so the filling firms slightly and flavors meld.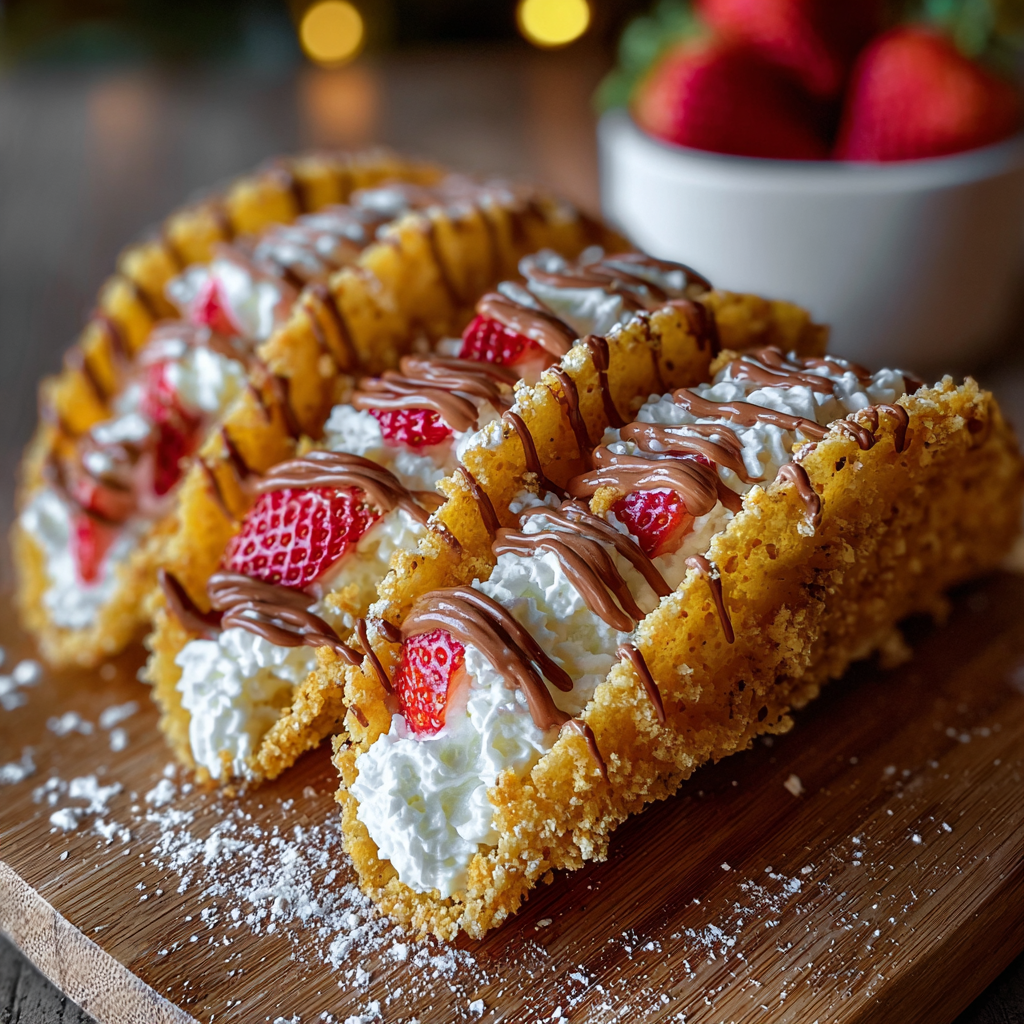
You Must Know
- The shells are best assembled a day ahead and stored in an airtight container at room temperature to keep crisp; fill them only before serving to maintain contrast.
- Room-temperature cream cheese whips up much smoother — cold cream cheese leads to lumps even after vigorous mixing.
- White chocolate sets quickly, so work in small batches when coating shells; if it thickens, gently rewarm in short bursts.
- These hold in the refrigerator for up to 48 hours; if left longer, the shells will gradually soften from moisture in the filling.
- Because of the white chocolate and cream cheese, these should be kept chilled if not eaten within an hour at room temperature.
My favorite part is the crunch-to-cream contrast: the first bite gives you that crisp shell and immediate white-chocolate sweetness, followed by the silky cream cheese center that balances the sugar with a mild tang. Making these for friends has become a holiday ritual — everyone has their favorite topping combination, and the kids love choosing their sprinkles and M&M colors. On a busy party night I’ll bake shells in the afternoon, chill them, and finish piping just before guests arrive for maximum freshness.
Storage Tips
Store unfilled shells at room temperature in a single layer inside an airtight container for up to 48 hours to preserve the snap. If you need longer storage, freeze shells flat separated with parchment to prevent sticking; thaw at room temperature before coating with chocolate. The filling keeps well in the refrigerator for up to 3 days in a sealed container; whip briefly to restore texture if it loses some volume. Once filled, keep the assembled tacos chilled and consume within 48 hours — the shells will slowly absorb moisture from the filling and lose crispness over time. For best reheating, do not microwave the assembled taco; instead, let it sit at room temperature for 10 minutes before serving.
Ingredient Substitutions
For a gluten-free option, use gluten-free flour tortillas and gluten-free graham crumbs (or finely crushed gluten-free cookies). Swap white chocolate for milk or dark chocolate if you prefer a less sweet shell — tempered dark chocolate gives an elegant sheen. To make the filling lighter, replace half the cream cheese with mascarpone or Greek yogurt (strained) for a tangier flavor, and reduce powdered sugar slightly. If you want a citrus lift, fold in 1–2 teaspoons of lemon zest to the filling; add fresh berries as a topping instead of candy for a less sugary finish. For a dairy-free version, use dairy-free cream cheese and coconut whipped cream, and select dairy-free chocolate and tortillas labeled vegan.
Serving Suggestions
Present these on a wide platter lined with parchment and arrange toppings in small bowls so guests can customize. Garnish with a small mint sprig for a fresh contrast or dust with extra graham crumbs for an elegant touch. Pair with hot coffee, mulled cider, or a sweet dessert wine like Moscato for holiday gatherings. For a brunch spin, serve alongside fresh fruit and mini pancakes; for an adults-only party, drizzle a little salted caramel over the filled tacos just before serving.
Cultural Background
These dessert tacos are a playful American mash-up that borrows techniques from classic no-bake cheesecake and the novelty of handheld desserts. The idea of making edible shells from tortillas is a modern, resourceful take on using pantry staples as molds rather than buying specialized equipment. White chocolate and crushed candy canes nod to seasonal American holiday treats, while the graham cracker crumbs recall the traditional American cheesecake crust. This hybrid approach is typical of home cooks who like to reinterpret favorites into fun, shareable formats.
Seasonal Adaptations
Switch toppings with the seasons: in summer, replace candy canes and sprinkles with macerated berries, lemon curd, and toasted coconut. For autumn, use crushed gingersnaps and a drizzle of pumpkin spice caramel; top with candied pecans. At Valentine’s Day, paint a thin layer of melted dark chocolate on the inside of the shell before adding the graham crumbs and finish with freeze-dried raspberries. These simple swaps let you tailor the dessert to any holiday without changing the core technique.
Meal Prep Tips
To streamline party prep, bake and coat all shells a day ahead and store them in a single layer separated with parchment. Prepare the filling in the morning and keep it chilled until about 30 minutes before serving, then transfer to a piping bag for quick assembly. If you need more speed, pipe the filling into disposable mini cupcake liners and top with garnishes for grab-and-go portions. Label containers with dates and keep all components chilled during transport in a cooler to retain texture and food safety. With this workflow you can assemble 30–40 tacos in under 20 minutes when guests arrive.
These dessert tacos are a cheerful, easy way to elevate a gathering without a lot of fuss. They’re proof that a few pantry staples and a little creativity can produce something that looks special and tastes even better — give them a try this season and make the toppings your own.
Pro Tips
Allow cream cheese to come to room temperature for at least 30 minutes to ensure a silky filling without lumps.
Work in small batches when coating shells with melted chocolate; white chocolate sets quickly and can thicken if left standing.
Keep shells unfilled until serving to maintain crunch; fill just before guests arrive or up to a few hours in advance if chilled.
This nourishing cheesecake tacos recipe is sure to be a staple in your kitchen. Enjoy every moist, high protein slice — it is perfect for breakfast or as a wholesome snack any time.
Tags
Cheesecake Tacos
This Cheesecake Tacos recipe makes perfectly juicy, tender, and flavorful steak every time! Serve with potatoes and a side salad for an unforgettable dinner in under 30 minutes.
Ingredients
Shells & Coating
Filling & Garnish
Instructions
Preheat and prepare the tin
Preheat oven to 350°F (176°C). Turn a standard muffin tin upside down on a baking sheet to create domes that will shape the tortilla rounds into shells. Line a separate baking sheet with parchment for later.
Cut and brush tortillas
Use a 4-inch round cutter to cut about three circles from each large tortilla. Lightly brush both sides of each circle with melted butter to ensure even browning and crisping while baking.
Mold and bake shells
Drape each buttered round over the inverted muffin tin domes and bake for 5–6 minutes until edges are lightly golden. Remove and let cool on the tin so shells retain their shape and crisp up.
Prepare coating mixture
Combine graham cracker crumbs, sprinkles, and crushed candy canes in a shallow bowl. Melt the white chocolate in a double boiler or microwave in short bursts until smooth, keeping it warm but not hot.
Coat shells with chocolate and crumbs
Brush the inside and rims of each cooled shell with melted white chocolate, then immediately roll in the graham mixture so the crumbs adhere. Place coated shells on the parchment-lined sheet and refrigerate until chocolate sets.
Make the filling
Beat softened cream cheese with powdered sugar and vanilla until smooth. Whip heavy cream to soft peaks and fold gently into the cream cheese mixture until light and airy.
Pipe and garnish
Fill a piping bag with the cheesecake filling and pipe into chilled shells. Top with sprinkles, crushed candy canes, and M&M’s. Chill filled tacos for at least 30 minutes before serving.
Last Step: Please leave a rating and comment letting us know how you liked this recipe! This helps our business to thrive and continue providing free, high-quality recipes for you.
Nutrition
Did You Make This?
Leave a comment & rating below or tag
@aiolirecipe on social media!
Categories:
You might also like...

Fall Harvest Pasta Salad
A cozy, colorful salad that celebrates autumn flavors — roasted butternut squash and Brussels sprouts tossed with pasta, cranberries, pecans, and tangy feta, finished with a balsamic vinaigrette.

Cilantro Lime Steak Bowls
Bright, tangy cilantro-lime marinated flank steak served over rice with black beans, corn, fresh veggies and creamy avocado for a fast, healthy weeknight bowl.

Pecan Pie Crescent Rolls
Buttery crescent rolls filled with a sweet pecan pie–inspired filling — a quick, crowd-pleasing dessert perfect for holidays or weeknight cravings.
Did You Make This?
Leave a comment & rating below or tag @aiolirecipe on social media!
Rate This Recipe
Share This Recipe
Enjoyed this recipe? Share it with friends and family, and don't forget to leave a review!
Comments (1)
This recipe looks amazing! Can't wait to try it.
Comments are stored locally in your browser. Server comments are displayed alongside your local comments.
Hi, I'm Olivia!
What's Popular

30-Minute Meals!
Join to receive our email series which contains a round-up of some of our quick and easy family favorite recipes.