
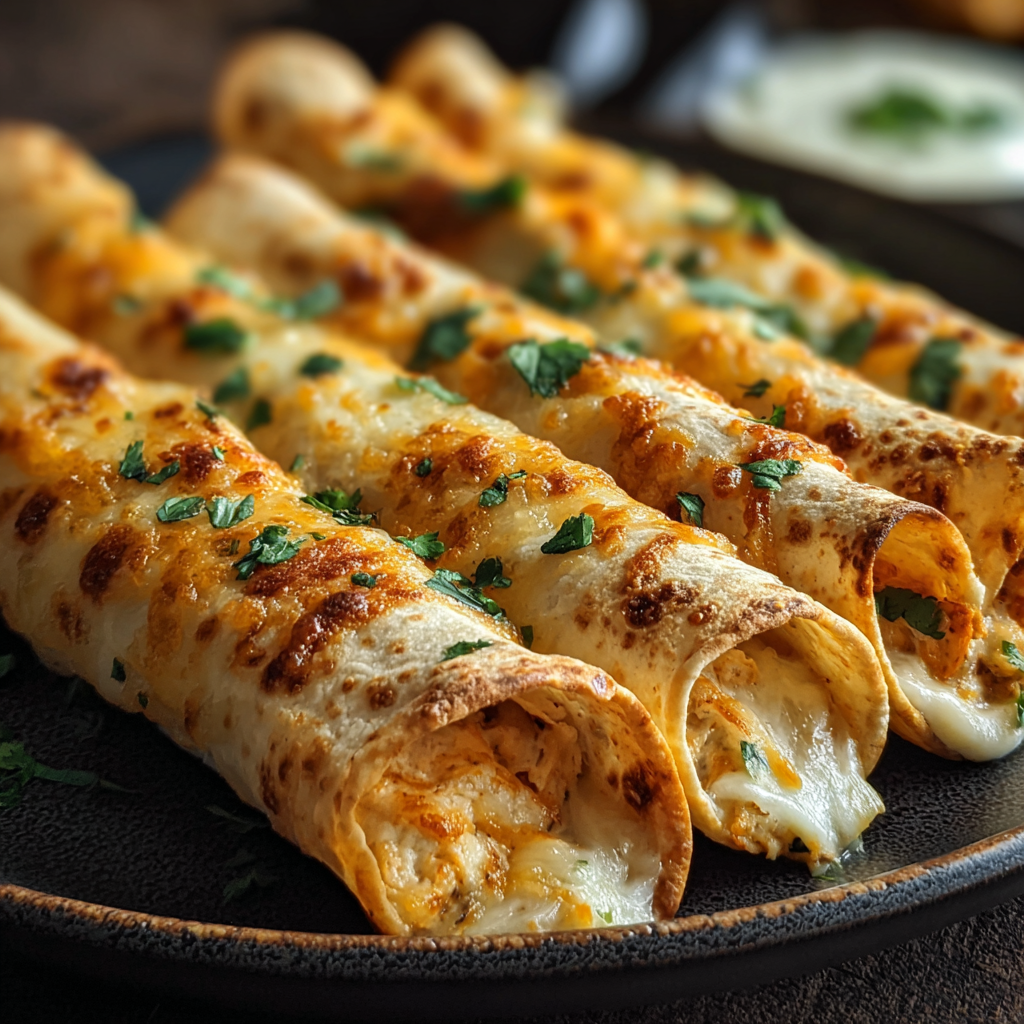
Crispy Chicken Taquitos

Golden, crunchy taquitos filled with creamy shredded chicken, melted cheese, and a touch of spice — perfect for weeknight dinners, parties, or game-day snacking.

This recipe began as a quick answer to a hungry Thursday night and turned into a household favorite within a single bake. I first discovered this combination when I had leftover rotisserie chicken and a fridge full of basics: cream cheese, a little shredded cheddar, and a jar of salsa. Rolling the rich filling into small tortillas and baking them until the edges went golden produced crunchy little cylinders that disappeared in minutes. The texture contrast — a crisp shell that gives way to a creamy, slightly spicy interior — is what keeps me making these again and again.
Beyond a convenient weeknight meal, these are the kind of finger food that sparks conversation at gatherings. I remember serving them at a backyard picnic where everyone, from toddlers to grandparents, reached for seconds. They travel well, reheat cleanly in an oven or air fryer, and they’re endlessly adaptable. Whether you use corn or flour tortillas, mild or spicy salsa, each variation feels like a new take while staying reliably satisfying.
Why You'll Love This Recipe
- Ready in about 35 minutes from start to finish: 15 minutes active prep and roughly 20 minutes baking, so it’s ideal for quick dinners or last-minute guests.
- Uses pantry-and-fridge staples like cooked chicken, cream cheese, shredded cheese, and tortillas; a rotisserie chicken makes this especially fast.
- Crowd-pleasing and shareable — great for game day, potlucks, and family dinners where you want something easy to eat and hold.
- Make-ahead friendly: you can roll them ahead and refrigerate or freeze before baking, then cook when you need them.
- Customizable spice level and toppings allow you to serve them mild for kids or kicked-up for adults without changing the basic method.
- Oven-baked for a lower oil option than deep-frying, yet still crisp and golden when brushed with a little oil or sprayed.
In my kitchen these have become the answer when friends pop by unexpectedly — I often keep a sealed container of shredded rotisserie chicken in the fridge specifically for this. Family members have debated toppings (I’m team guacamole), and I’ve learned small tricks, like warming tortillas briefly to prevent cracking, that guarantee success every time.
Ingredients
- Cooked shredded chicken: About 2 cups of rotisserie chicken or leftover roasted chicken. Dark meat offers extra moisture and flavor, while white meat gives a leaner result; shred finely so it binds easily with the cream cheese.
- Cream cheese: 4 ounces, softened. Full-fat gives the creamiest texture and helps the filling bind, while low-fat will yield a slightly tangier, firmer filling.
- Shredded cheddar or Mexican blend cheese: 1/2 cup freshly shredded — pre-shredded is fine but often contains anti-caking agents that melt differently.
- Salsa: 1/4 cup, mild or spicy depending on preference. Use a chunky salsa for texture or a smoother one for a uniform filling.
- Spices: 1/2 teaspoon each garlic powder, chili powder, and cumin. These pantry spices add warmth and depth; adjust to taste.
- Tortillas: 8 small flour or corn tortillas. Flour tortillas are more forgiving and less likely to crack; corn offers authentic flavor and a slightly crisper finish when baked.
- Salt and pepper: To taste — a small pinch will brighten the filling.
- Oil or cooking spray: For brushing or spraying the outside so the shells crisp up in the oven.
- Optional toppings: Chopped cilantro, sour cream, guacamole, and extra shredded cheese elevate each bite and add freshness.
Instructions
Preheat and prepare baking sheet:Set the oven to 425°F (220°C). Line a baking sheet with parchment paper or lightly grease it to prevent sticking. A rimmed sheet helps catch any melting cheese. Position a rack in the upper-middle third of the oven for optimal browning.Make the filling:In a large bowl, combine 2 cups shredded cooked chicken, 4 oz softened cream cheese, 1/2 cup shredded cheddar or Mexican blend, 1/4 cup salsa, 1/2 teaspoon garlic powder, 1/2 teaspoon chili powder, 1/2 teaspoon cumin, and salt and pepper to taste. Use a fork to mash and mix until evenly combined and the cream cheese is incorporated; the mixture should be spreadable but not runny.Warm the tortillas:Wrap the tortillas in a slightly damp paper towel and microwave for about 20 seconds, or warm briefly in a dry skillet. Warming prevents tearing and makes rolling easier. Work quickly so they stay pliable.Fill and roll:Spoon 2–3 tablespoons of filling along one side of each warmed tortilla, leaving a small border. Tightly roll each tortilla around the filling, tucking the seam underneath so they sit seam-side down on the baking sheet. Keep them snug so the filling doesn’t spill during baking.Prepare for baking:Place the taquitos seam-side down on the prepared sheet, spacing them about 1/2 inch apart. Lightly brush each taquito with oil or spray with cooking spray to encourage even browning and crispness on the outside.Bake and finish:Bake for 15–20 minutes until golden and crisp; time depends on tortilla type and oven. For extra crunch, switch to broil for 1–2 minutes at the end, watching closely so they don’t burn. Remove and let rest 2 minutes before serving to allow the filling to set slightly.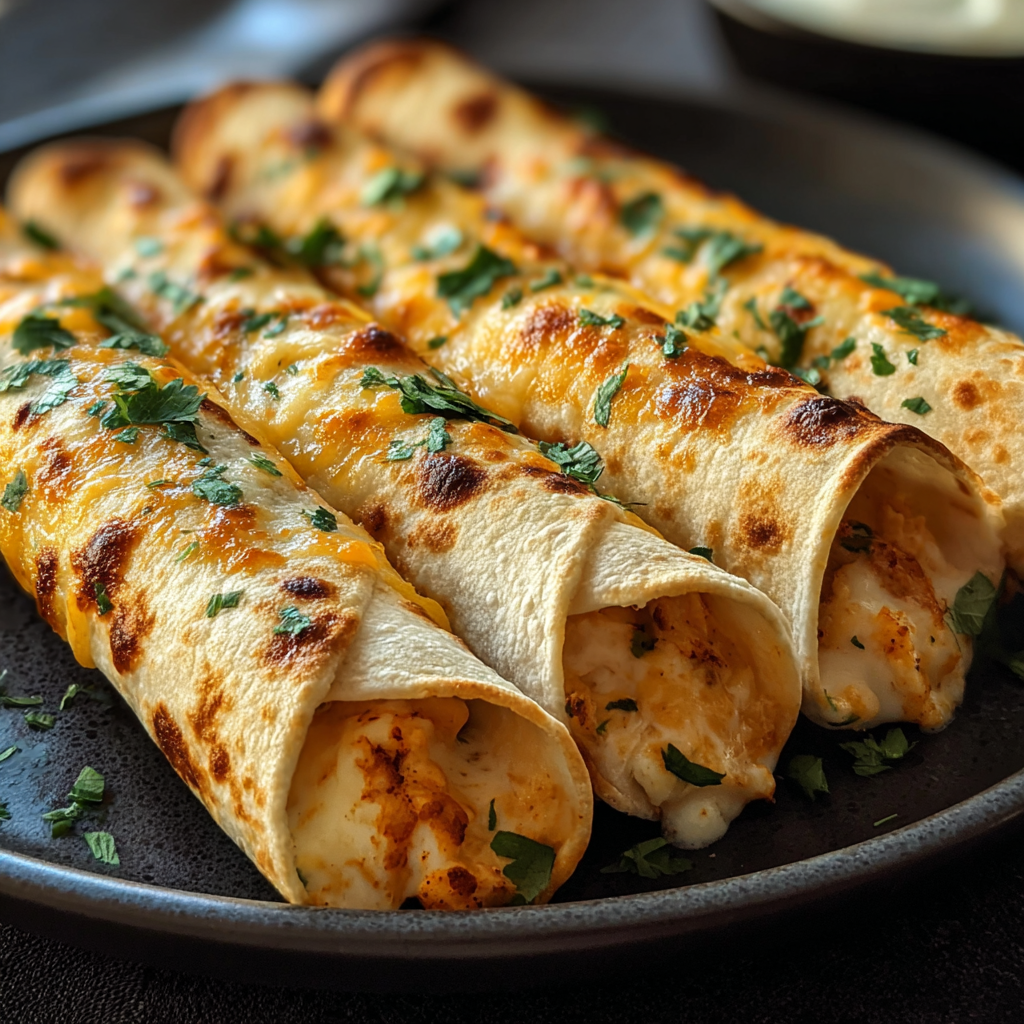
You Must Know
- The filling keeps well: refrigerated in an airtight container for up to 3 days and frozen for up to 3 months before baking.
- These are not dairy-free due to cream cheese and cheddar; use dairy-free cream cheese and vegan cheese for a dairy-free variation.
- Nutrition note: the dish is moderate to high in protein thanks to the chicken, but also contains fats from cheese and cream cheese; portion accordingly.
- Use corn tortillas for a gluten-free option — make sure they are labeled gluten-free and warm them well to avoid cracking.
My favorite part is how adaptable this formula is. I once made a batch with a smoky chipotle salsa and the deeper flavor turned them into an irresistible party snack. Another time I rolled a smaller portion size for kids’ lunches and froze them flat; reheating in the oven made them taste freshly made. Family members often argue about the best topping — I prefer a dollop of guacamole and a scattering of cilantro for brightness.
Storage Tips
To keep leftovers crisp, refrigerate cooled taquitos in a single layer in an airtight container for up to 3 days. If stacking, place parchment between layers to prevent sogginess. Reheat in a 375°F (190°C) oven for 8–10 minutes or in an air fryer at 350°F (175°C) for 4–6 minutes until heated through and re-crisped. For freezing, arrange unbaked rolled taquitos on a tray until firm, then transfer to a freezer bag; bake from frozen at 425°F (220°C), adding 5–8 minutes to the bake time and checking until golden.
Ingredient Substitutions
If you need to modify ingredients, swap cream cheese for mashed avocado or Greek yogurt for a lighter filling — note the texture will be looser and might benefit from extra shredded chicken. Replace cheddar with pepper jack for heat or Monterey Jack for a milder profile. For a vegetarian version, substitute shredded jackfruit or seasoned cooked beans mixed with a tablespoon of olive oil to mimic the mouthfeel of shredded chicken. For a dairy-free route, use plant-based cream cheese and vegan shredded cheese brands that melt well.
Serving Suggestions
Serve these with classic accompaniments like sour cream, fresh guacamole, chopped cilantro, lime wedges, and extra salsa on the side. For a composed plate, add a simple cabbage slaw tossed with lime and a pinch of sugar for crunch and acidity. Pair with Mexican-style rice and refried or black beans for a fuller meal, or serve as appetizers with a trio of dips: salsa verde, chipotle crema, and guacamole.
Cultural Background
Taquitos — little rolled tortillas often filled with meat and fried — are a staple of Mexican and Tex-Mex cuisine that evolved into many regional forms. The oven-baked version here is a popular American adaptation that keeps the spirit of the classic while making it easier for home cooks. The filling flavors used (cumin, chili powder, garlic) reflect the spice palette common in Northern Mexican cooking, while the use of shredded rotisserie chicken is a modern convenience that aligns with home-cooking traditions.
Seasonal Adaptations
In summer, swap the salsa for a bright, fresh pico de gallo with extra cilantro and lime, and serve with a corn-and-black-bean salad. In colder months, try a warm roasted poblano-and-onion salsa mixed into the filling for a deeper, smoky flavor. For holiday gatherings, make a spiced turkey version using leftover roast turkey with a cranberry-chipotle salsa for a festive twist.
Meal Prep Tips
For batch cooking, prepare the filling up to 3 days ahead and keep chilled. Roll taquitos and place seam-side down on a tray; cover tightly and refrigerate for up to 24 hours or freeze for up to 3 months. Label bags with baking instructions. When ready to serve, pop refrigerated taquitos straight into a preheated oven; frozen ones can be baked from frozen with a few extra minutes. Use silicone baking mats for easy cleanup and consistent browning.
These taquitos are easy to make your own: tweak spices, cheeses, and toppings until you find the combination that becomes your go-to. They’re proof that a few simple ingredients can produce something crunchy, creamy, and utterly craveable — and sharing them always brings a smile.
Pro Tips
Warm tortillas before filling to prevent cracking and ensure easier rolling.
Use full-fat cream cheese for a creamier interior and better binding.
Brush with oil or use cooking spray before baking to achieve an even, golden crisp.
For extra crunch, broil for 1–2 minutes at the end but watch closely to avoid burning.
This nourishing crispy chicken taquitos recipe is sure to be a staple in your kitchen. Enjoy every moist, high protein slice — it is perfect for breakfast or as a wholesome snack any time.
FAQs about Recipes
Can I freeze these taquitos?
Yes, you can freeze unbaked rolled taquitos on a tray until firm, then transfer to a freezer bag. Bake from frozen and add 5–8 minutes to the normal bake time.
How do I prevent tortillas from cracking?
Warming tortillas briefly in the microwave or on a skillet for 15–20 seconds prevents tearing and makes rolling much easier.
Tags
Crispy Chicken Taquitos
This Crispy Chicken Taquitos recipe makes perfectly juicy, tender, and flavorful steak every time! Serve with potatoes and a side salad for an unforgettable dinner in under 30 minutes.
Ingredients
Filling
Spices & Seasoning
Shells & Finish
Optional toppings
Instructions
Preheat and prepare baking sheet
Preheat oven to 425°F (220°C). Line a baking sheet with parchment paper or lightly grease it. Position a rack in the upper-middle third of the oven for even browning.
Combine filling ingredients
In a large bowl, mix shredded chicken, softened cream cheese, shredded cheese, salsa, garlic powder, chili powder, cumin, salt, and pepper until evenly combined and spreadable.
Warm the tortillas
Wrap tortillas in a damp paper towel and microwave for about 20 seconds or warm briefly in a dry skillet to make them pliable and prevent cracking.
Fill and roll tightly
Spoon 2–3 tablespoons of filling onto one side of each tortilla, roll tightly, and place seam-side down on the baking sheet to secure the roll.
Brush and bake
Lightly brush with oil or spray with cooking spray. Bake for 15–20 minutes until golden and crispy; optionally broil 1–2 minutes for extra browning. Let rest 1–2 minutes before serving.
Last Step: Please leave a rating and comment letting us know how you liked this recipe! This helps our business to thrive and continue providing free, high-quality recipes for you.
Nutrition
Did You Make This?
Leave a comment & rating below or tag
@aiolirecipe on social media!
Categories:
You might also like...

Fall Harvest Pasta Salad
A cozy, colorful salad that celebrates autumn flavors — roasted butternut squash and Brussels sprouts tossed with pasta, cranberries, pecans, and tangy feta, finished with a balsamic vinaigrette.

Cilantro Lime Steak Bowls
Bright, tangy cilantro-lime marinated flank steak served over rice with black beans, corn, fresh veggies and creamy avocado for a fast, healthy weeknight bowl.

Pecan Pie Crescent Rolls
Buttery crescent rolls filled with a sweet pecan pie–inspired filling — a quick, crowd-pleasing dessert perfect for holidays or weeknight cravings.
Did You Make This?
Leave a comment & rating below or tag @aiolirecipe on social media!
Rate This Recipe
Share This Recipe
Enjoyed this recipe? Share it with friends and family, and don't forget to leave a review!
Comments (1)
This recipe looks amazing! Can't wait to try it.
Comments are stored locally in your browser. Server comments are displayed alongside your local comments.
Hi, I'm Olivia!
What's Popular

30-Minute Meals!
Join to receive our email series which contains a round-up of some of our quick and easy family favorite recipes.