
Onion Ring Chips

Crispy, golden onion rings with a seasoned flour dredge, buttermilk soak, and a crunchy panko finish — perfect for snacking, dipping, and sharing.
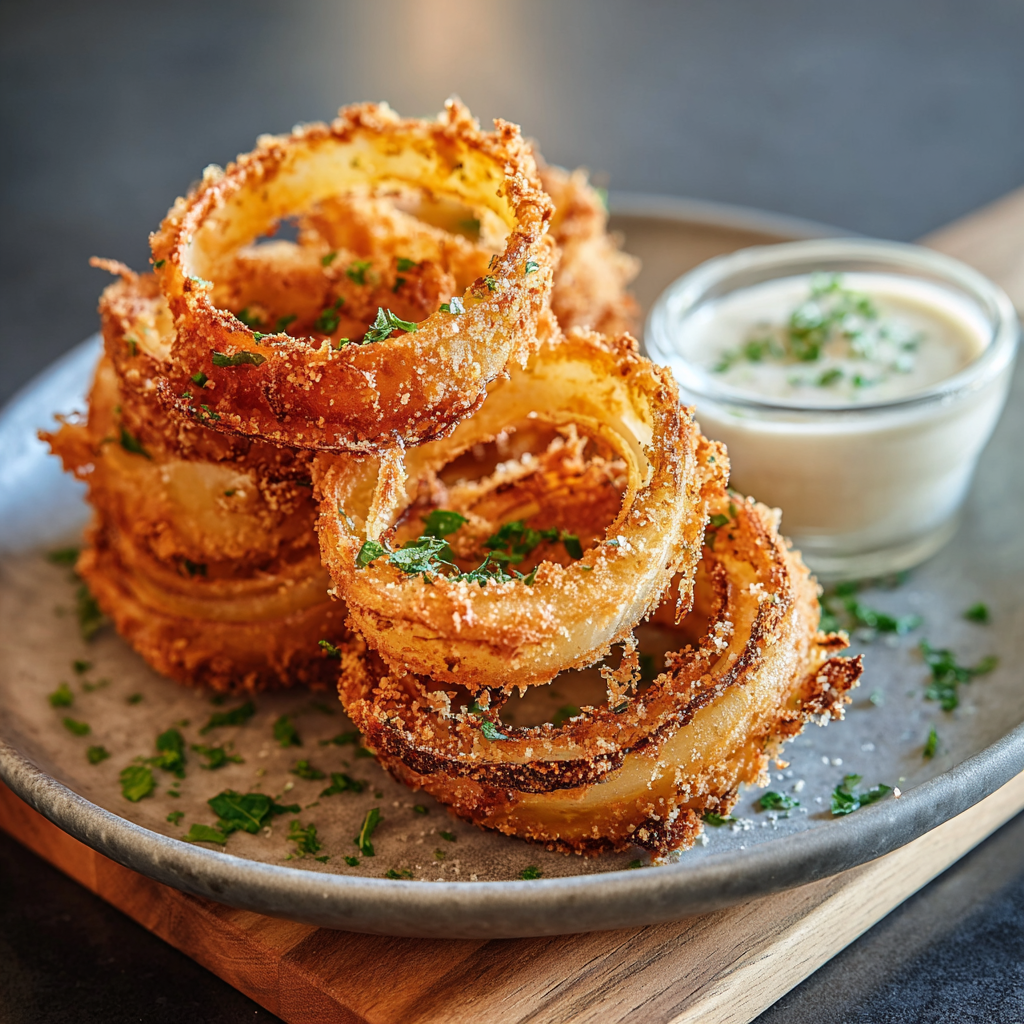
This batch of onion ring chips is the kind of recipe I return to when I want something crunchy, comforting, and a little bit celebratory. I first nailed this combination of a seasoned flour dredge, a short buttermilk soak, and a double-coating of panko one rainy afternoon when I wanted something to pair with a homemade aioli. The result was one of those discoveries that immediately became a rotation favorite: the exterior crisps up to a light, shattering crunch while the onion inside steams to a tender sweetness. Every bite delivers contrast — crisp coating, soft onion, and a whisper of the spices from the dredge.
I love making these when friends drop by or for a weekend movie night. Two large onions yield a generous platter of rings that disappear fast. The technique is forgiving: drying the rings well, keeping the oil temperature steady, and working in small batches are the keys. Over time I learned little tricks — like patting rings with paper towels, shaking off excess buttermilk before the first dredge, and pressing panko gently so it adheres without compacting — that make the texture reliably excellent. These onion ring chips are snackable, shareable, and a perfect match for a garlicky aioli or spicy ketchup.
Why You'll Love This Recipe
- Reliable crunch every time thanks to a two-step coating: seasoned flour first, then buttermilk and panko for extra texture and color.
- Uses pantry staples — flour, panko, basic spices, and buttermilk — so you can make them spontaneously without a special shopping trip.
- Fast to pull together: about 20 minutes of prep and roughly 15 minutes of active frying, so they’re ready in under 40 minutes.
- Make-ahead friendly: you can pre-cut and pat dry the rings, refrigerate for a few hours, and fry just before serving.
- Crowd-pleasing and versatile — serve as an appetizer, snack, or alongside burgers for a nostalgic touch.
- Customizable coatings let you tune flavor and texture: swap panko for crushed cornflakes for an extra flaky crunch.
When I first served these to my neighbors, they disappeared in minutes. The crunchy exterior and sweet, tender onion inside prompted immediate requests for the recipe. Over time I refined the spice ratio in the dredge to bring forward garlic and paprika notes without overpowering the onion. The dish has become my go-to for informal get-togethers because it’s simple to scale and easy to adapt to different dipping sauces.
Ingredients
- Onions (Main): 2 large onions, peeled and sliced into 1/4-inch rings. Choose firm, dry onions such as sweet or yellow varieties; they hold shape and caramelize slightly under the hot oil without becoming mushy. If using Spanish or Vidalia, expect a sweeter interior.
- All-purpose flour (Dredge): 1 cup to create a dry base for adhesion. Standard brands like King Arthur or Gold Medal work well and give an even, light barrier that crisps quickly in hot oil.
- Seasonings (Dredge): 1 teaspoon garlic powder, 1 teaspoon paprika, 1/2 teaspoon salt, 1/2 teaspoon black pepper. These balance sweet onion flavors with savory warmth; smoked paprika can be used for a smoky accent.
- Buttermilk (Soak & Coating): 1 cup. The mild acidity tenderizes the onion and helps the coatings adhere; if you don’t have buttermilk use 1 cup milk mixed with 1 tablespoon white vinegar and let sit 5 minutes.
- Panko breadcrumbs (Coating): 2 cups. Japanese-style panko yields the light, airy crunch that distinguishes these chips from traditional crumbs. Brands like Kikkoman-style or local supermarket panko are ideal.
- Vegetable oil (For frying): About 4 cups to reach 2 inches depth in a skillet or Dutch oven. Use neutral oil with a high smoke point such as canola, sunflower, or peanut oil.
Instructions
Slice and dry onions: Peel 2 large onions and slice them evenly into 1/4-inch rings. Separate the rings gently and arrange them on a layer of paper towels. Pat both sides dry — removing surface moisture prevents the coatings from sliding off and reduces sputter when the rings hit the oil. Prepare dry dredge: In a shallow bowl whisk together 1 cup all-purpose flour, 1 teaspoon garlic powder, 1 teaspoon paprika, 1/2 teaspoon salt, and 1/2 teaspoon black pepper. An even seasoning distribution is important because this first layer flavors the exterior directly and acts as a glue for the buttermilk. Buttermilk soak: Pour 1 cup buttermilk into a separate shallow dish. Place rings into the buttermilk and let sit about 5 minutes to tenderize the onion and enhance adhesion. Do not over-soak — the goal is surface wetting, not a soggy ring. First dredge: Remove rings from buttermilk, shaking off excess liquid, and dredge each ring in the seasoned flour. Tap off extra flour; you want a thin, even layer. Place dredged rings on a cooling rack to avoid soggy bottoms and to keep airflow around each piece. Panko coating: Dip the floured rings back into the buttermilk briefly, then press each side into 2 cups panko breadcrumbs. Press gently so the panko adheres but doesn’t compact into a dense crust — that lightness is what yields the shattering crunch. Heat oil: Heat vegetable oil in a heavy skillet or pot to a depth of approximately 2 inches (about 4 cups oil) and bring to 350°F (175°C). Use a deep-fry thermometer to maintain temperature — if oil is too cool the coating absorbs oil; if too hot the exterior burns before the onion softens. Fry in batches: Working in small batches, add rings in a single layer and fry 2–3 minutes per side until deep golden and crisp. Turn gently with a slotted spoon or spider to avoid knocking off the coating. Transfer to a wire rack set over a sheet pan to drain and remain crisp. Season and serve: While still hot, sprinkle rings lightly with an extra pinch of salt. Serve immediately with aioli, ketchup, or your favorite dipping sauce for best texture.
You Must Know
- Temperature is everything: keep oil at a steady 350°F (175°C) — use a thermometer and adjust the heat between batches to maintain it.
- Dry onions fry better: remove as much surface moisture as possible before the dredge to prevent slipping and excess splatter.
- Batch size matters: overcrowding drops oil temperature and yields greasy rings; 3–4 rings at a time in a 10-inch skillet is a safe guideline.
- Storage: cooked rings are best eaten fresh. If you must store, cool completely and re-crisp in a 400°F (200°C) oven for 5–7 minutes.
My favorite part of making these is the immediate crunch when you bite in — it’s unmistakable and always solicits appreciative noises around the table. The crunchy exterior and sweet interior create a contrast that feels indulgent yet simple, and pairing with a lemony aioli brightens the whole experience. These have become the unofficial appetizer at casual dinners because they’re fast, economical, and reliably delicious.
Storage Tips
Leftover onion ring chips should be cooled completely on a rack before storing to avoid condensation and sogginess. Place them in a shallow airtight container lined with a paper towel to absorb residual moisture and store in the refrigerator for up to 2 days. Reheat in a preheated 400°F (200°C) oven on a wire rack for 5–8 minutes; this restores crispness better than a microwave. For longer storage, flash-freeze in a single layer on a tray, transfer to a freezer bag, and keep for up to 3 months — reheat from frozen in a hot oven for 8–12 minutes.
Ingredient Substitutions
If you don’t have buttermilk, make a quick substitute by adding 1 tablespoon white vinegar or lemon juice to 1 cup milk and resting 5 minutes. For a gluten-free option, substitute the all-purpose flour with a 1:1 gluten-free flour blend and swap panko for gluten-free breadcrumbs or crushed rice crackers. To reduce frying oil, try an oven-baked version: lightly oil the coated rings, place on a wire rack set over a sheet pan, and bake at 425°F (220°C) for 10–12 minutes, flipping halfway — the texture will be crisp but slightly less airy than panko-fried rings.
Serving Suggestions
These chips shine as a party appetizer or alongside burgers and sandwiches. Present them piled on a platter with small bowls of dipping sauces: garlic aioli, chipotle mayo, classic ketchup, or a honey mustard. Garnish with chopped parsley or a dusting of smoked paprika for visual appeal. For a fuller snack plate, add celery sticks, pickles, and small skewers of cheese or cured meat. They’re particularly nice with a cold beer or a citrus-forward cocktail to cut through the richness.

Cultural Background
Onion rings are an American comfort classic with roots in early 20th-century diner culture and the broader tradition of fried snacks. While variations exist worldwide — from beer-battered rings to tempura-style onions in Japan — the panko-coated version adds a contemporary, Japanese-inspired crunch that became popular as fusion approaches entered home kitchens. Regional twists like adding cornmeal in the South or serving with malt vinegar in British fish-and-chip shops reflect local tastes and available pantry staples.
Seasonal Adaptations
In spring and summer use sweeter onions like Vidalia or Walla Walla for a mellow interior; in fall and winter, stronger yellow onions stand up better to frying and pair well with smoked paprika. For holiday gatherings, add finely ground dried herbs or a pinch of cayenne to the dredge for warmth. You can also incorporate seasonal condiments — a cranberry-mustard dip or a roasted garlic aioli with thyme — to tie the chips into a festive menu.
Meal Prep Tips
To streamline service for a crowd, slice and dry the rings up to 24 hours in advance and keep them chilled on a tray covered loosely with a kitchen towel. Set up a dredging assembly line: flour mix, buttermilk, and panko. Coat and arrange the prepared rings on a rack and refrigerate until ready to fry. Reserve heating the oil until just before guests arrive so you can produce fresh, hot batches on demand without long waits.
These onion ring chips bring crunchy satisfaction to any casual meal and reward a little careful technique with a lot of flavor. Try making a double batch for parties — they’ll vanish quickly and earn you repeat requests. Enjoy the simple pleasure of homemade crunch, and don’t be afraid to experiment with the seasoning blend to make it your own.
Pro Tips
Pat onion rings completely dry before dredging to improve adhesion and reduce splatter.
Use a deep-fry thermometer and adjust heat between batches to maintain 350°F (175°C).
Press panko gently onto the buttermilk-coated rings to create a light, airy crust rather than a compacted coating.
Fry in single layers and transfer to a wire rack to keep them crisp while cooling.
This nourishing onion ring chips recipe is sure to be a staple in your kitchen. Enjoy every moist, high protein slice — it is perfect for breakfast or as a wholesome snack any time.
FAQs about Recipes
What temperature should I fry the rings at?
Keep oil at 350°F (175°C) and fry in small batches to ensure the coating crisps without absorbing excess oil.
Can I reheat leftover onion rings?
Yes — cool completely and reheat in a 400°F (200°C) oven for 5–8 minutes on a wire rack to restore crispness.
Tags
Onion Ring Chips
This Onion Ring Chips recipe makes perfectly juicy, tender, and flavorful steak every time! Serve with potatoes and a side salad for an unforgettable dinner in under 30 minutes.
Ingredients
Main
Dredge
Soak and Coating
For Frying
Instructions
Slice and dry onions
Peel and slice onions into 1/4-inch rings, separate rings, and pat dry with paper towels to remove surface moisture for better adhesion.
Prepare dry dredge
Whisk flour, garlic powder, paprika, salt, and black pepper in a shallow bowl to create a seasoned flour for the first coating.
Buttermilk soak
Place rings in buttermilk and let sit 5 minutes to tenderize and help the coating adhere; do not oversoak.
First dredge
Shake off excess buttermilk and dredge each ring in the seasoned flour, tapping off excess to leave a thin, even layer.
Panko coating
Dip floured rings back into buttermilk and press into panko breadcrumbs until well-coated on both sides; avoid compacting the panko.
Heat oil
Heat vegetable oil to 350°F (175°C) to a depth of about 2 inches using a heavy skillet or pot; use a thermometer for accuracy.
Fry in batches
Fry rings in a single layer 2–3 minutes per side until golden and crisp, avoid overcrowding, and drain on a wire rack.
Season and serve
Sprinkle with a pinch of salt while hot and serve immediately with your choice of dips such as aioli or ketchup.
Last Step: Please leave a rating and comment letting us know how you liked this recipe! This helps our business to thrive and continue providing free, high-quality recipes for you.
Nutrition
Did You Make This?
Leave a comment & rating below or tag
@aiolirecipe on social media!
Categories:
You might also like...

Fall Harvest Pasta Salad
A cozy, colorful salad that celebrates autumn flavors — roasted butternut squash and Brussels sprouts tossed with pasta, cranberries, pecans, and tangy feta, finished with a balsamic vinaigrette.

Cilantro Lime Steak Bowls
Bright, tangy cilantro-lime marinated flank steak served over rice with black beans, corn, fresh veggies and creamy avocado for a fast, healthy weeknight bowl.

Pecan Pie Crescent Rolls
Buttery crescent rolls filled with a sweet pecan pie–inspired filling — a quick, crowd-pleasing dessert perfect for holidays or weeknight cravings.
Did You Make This?
Leave a comment & rating below or tag @aiolirecipe on social media!
Rate This Recipe
Share This Recipe
Enjoyed this recipe? Share it with friends and family, and don't forget to leave a review!
Comments (1)
This recipe looks amazing! Can't wait to try it.
Comments are stored locally in your browser. Server comments are displayed alongside your local comments.
Hi, I'm Olivia!
What's Popular

30-Minute Meals!
Join to receive our email series which contains a round-up of some of our quick and easy family favorite recipes.