
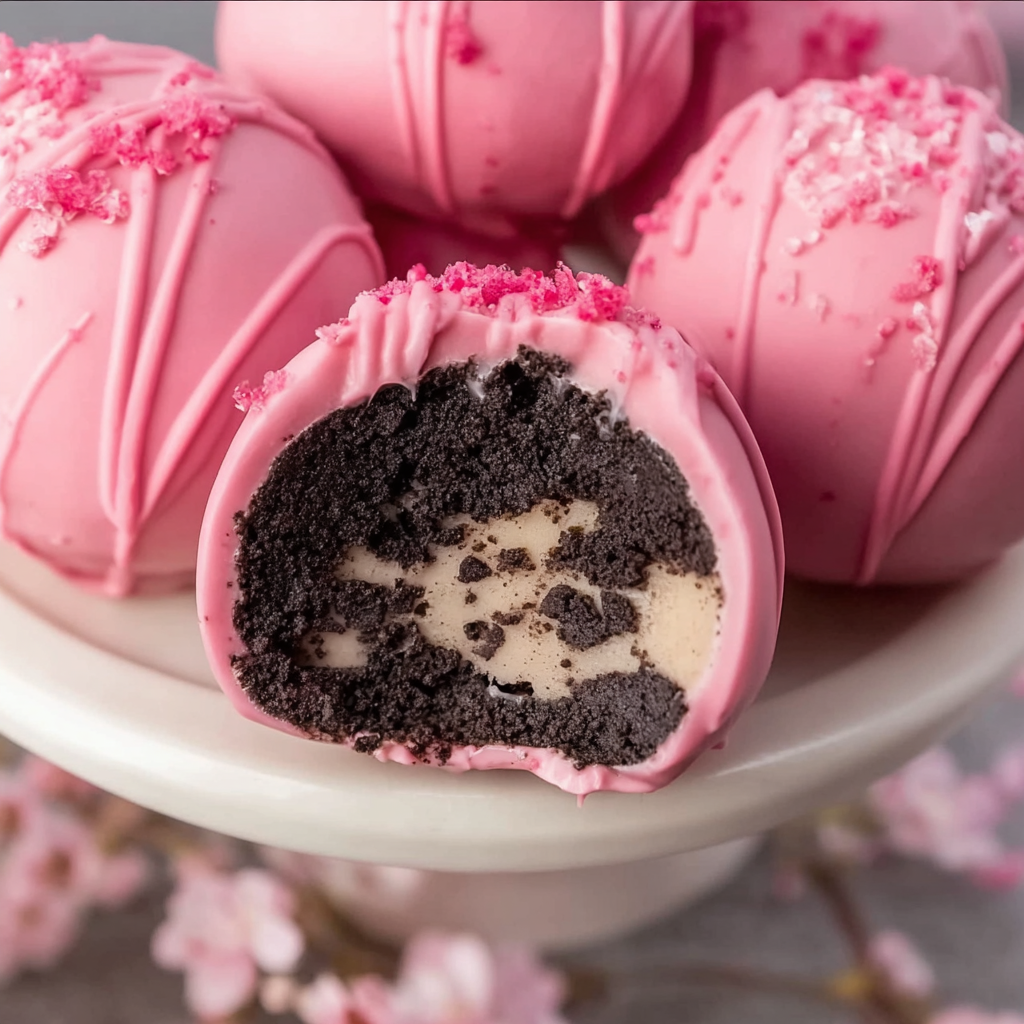
Oreo Truffle Balls with Pink Candy Coating

Delicate Oreo truffle balls rolled from cookie crumbs and cream cheese, dipped in pink candy coating and finished with festive sprinkles — a quick, crowd-pleasing sweet.

This recipe for Oreo truffle balls with a pink candy coating has been my go-to for holidays, baby showers, and last-minute gatherings. I first made these on a grey February afternoon when I needed something cheerful to bring to a friend’s surprise brunch; the vivid pink coating and sweet, creamy center turned out to be exactly the lift everyone needed. The contrast between the crisp, chocolatey cookie crumbs and the silky cream cheese center is what makes these treats irresistible — they’re small, bite-sized, and perfectly balanced so that one or two are enough to satisfy a sweet craving.
What I love about this version is how forgiving it is: the dough holds its shape without fuss, the coating sets quickly, and the results look professional even if you’re new to dipping confections. I discovered a few simple tricks along the way — chilling the rolled balls until firm, thinning the candy melts with a touch of oil for a smoother finish, and using a fork-dip technique to avoid fingerprints — and those little details really transform the final bite. These truffles are sweet but never cloying, with a tender center and a satisfying snap from the candy shell.
Why You'll Love This Recipe
- Ready in under an hour from start to finish when you include chilling time; active work time is about 20 minutes, making it ideal for quick party prep.
- Uses pantry staples: a standard 14.3-ounce pack of sandwich cookies and cream cheese are the only perishable items you need, so it’s easy to pull together on short notice.
- Make-ahead friendly — roll and freeze the centers, then dip the day of the event for fresh, glossy shells and minimal last-minute work.
- Customizable: swap cookie flavors, color the coating any hue, or add mix-ins and different sprinkles to match any theme or season.
- Kid-friendly to assemble and visually appealing for celebrations like birthdays, bridal showers, or Valentine’s Day.
- Great for gifting: arrange in a box with parchment and a bow — they travel well for short distances when chilled.
Personally, my family goes wild for these during holiday cookie swaps. Once, I brought a tray to a neighborhood potluck and someone called them "tiny cookies of joy." My little ones insisted on sprinkling almost every truffle, and that messy, hands-on moment has become a happy tradition whenever I make this treat.
Ingredients
- Oreo cookies (14.3 oz / about 36 cookies): Standard sandwich cookies are ideal for that classic chocolate-and-cream flavor. I use the original brand for consistent texture and sweetness; if you prefer a less sweet center, try a reduced-sugar cookie or divide the packet and taste as you go.
- Cream cheese (8 oz), softened to room temperature: Full-fat cream cheese gives a rich, silky mouthfeel and helps the crumbs bind without becoming greasy. Let it sit at room temperature for 20–30 minutes so it blends smoothly with the cookie crumbs.
- Powdered sugar (1/4 cup, optional): Add only if you prefer a sweeter center — powdered sugar blends cleanly and won’t grainy-ize the texture.
- Pink candy melts (2 cups): These provide the glossy shell. Candy melts are favored for dipping because they set firm at room temperature without tempering chocolate; choose a candy-brand you trust for even melting.
- Coconut oil or vegetable oil (1 tablespoon): A small amount thins the melts for a smoother coating and better shine. Use neutral vegetable oil if you don’t want a hint of coconut flavor.
- Sprinkles (1/4 cup pink, red, and white, optional): Adds a festive finish. Use nonpareils or jimmies depending on the texture you like.
Instructions
Prepare the Oreo truffle mixture: Place the cookies in a food processor and pulse until they form fine crumbs resembling sand. If you don’t have a processor, seal the cookies in a heavy zip-top bag and crush them with a rolling pin until fine. Transfer crumbs to a large bowl, add the softened cream cheese, and mix with a spatula or your hands until fully combined into a moist, uniform dough. For a sweeter filling, sift in 1/4 cup powdered sugar and blend until smooth. The mixture should be tacky but not overly wet. Form the balls and chill: Line a baking sheet with parchment paper. Scoop rounded teaspoons of dough or use a small cookie scoop and roll into 1-inch balls between your palms for a smooth surface. Space them evenly on the sheet. Freeze for 20–30 minutes, or refrigerate for at least 1 hour; the centers must be firm before dipping to prevent distortion and melting during coating. Melt the candy coating: Place the pink candy melts in a microwave-safe bowl with 1 tablespoon coconut or vegetable oil. Microwave on medium power in 30-second bursts, stirring between bursts until fully melted and glossy. Avoid overheating — the coating should be warm and pourable but not scalding. If it cools and thickens, reheat briefly in 10–15 second intervals, stirring constantly. Dip the truffles: Remove the chilled balls from the freezer. Using a dipping fork or regular fork, gently lower a ball into the melted coating, roll to cover evenly, then lift and tap the fork against the side of the bowl to remove excess. Place back on the parchment-lined sheet. While the coating is still wet, sprinkle with the pink, red, and white sprinkles to secure them into the shell. Work in small batches so the coating remains fluid. Set and store: After all balls are coated, chill the tray in the refrigerator for 10–15 minutes to fully set the shells. Once firm, transfer to an airtight container and keep refrigerated for up to 7 days or freeze for up to 3 months. Thaw overnight in the fridge before serving for best texture.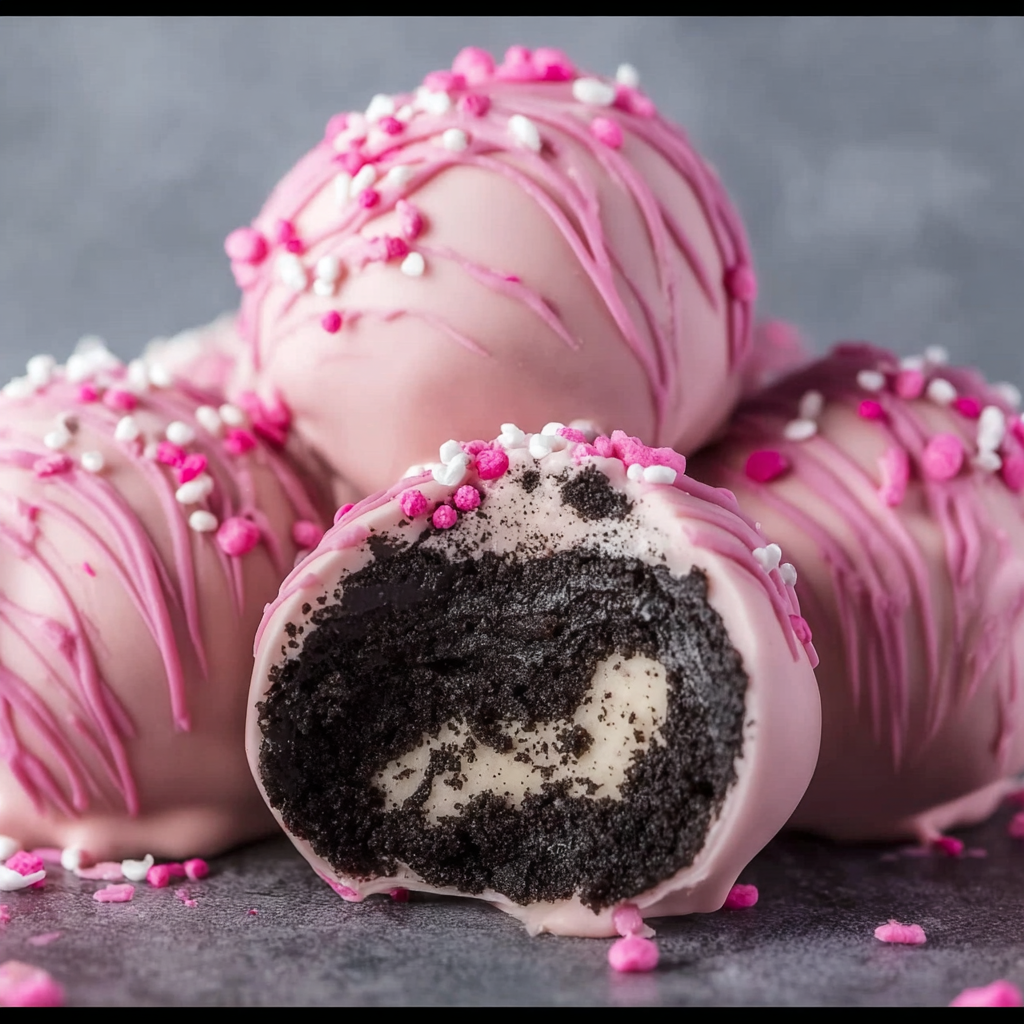
You Must Know
- High in sweetness and calories: one small truffle is rich — plan portion sizes if serving to children or dietary-restricted guests.
- Freezer-friendly for up to 3 months; store in a single layer on a tray then transfer to a sealed container or freezer bag to avoid sticking.
- The candy shell sets quickly; keep the melted coating warm and fluid to avoid thick, uneven shells or streaking.
- If you want a glossier finish, add an additional 1/2 teaspoon of oil to the melts and stir thoroughly until the shine returns.
My favorite part is the moment the tray comes out of the fridge — the candy shell snaps pleasantly, revealing the soft, mousse-like center beneath. At family gatherings people always remark on how indulgent they taste for such a simple assembly. I keep a batch in the freezer for unexpected guests; five minutes on the counter and they’re perfect for serving.
Storage Tips
For short-term storage keep the truffles in an airtight container in the refrigerator for up to 7 days; use parchment layers to prevent sticking. If you need longer storage, freeze them flat on a tray until solid, then stack in a freezer-safe container with parchment between layers for up to 3 months. When transporting, pack the container with an insulated gel pack to keep the shells from sweating. To serve frozen truffles, move them to the refrigerator for a few hours then bring to room temperature for about 10–15 minutes so the center softens slightly while the shell remains intact.
Ingredient Substitutions
If you don’t have Oreo cookies, use any sandwich cookie of similar size — chocolate wafers with vanilla crème work best for a classic profile. For a gluten-free alternative choose certified gluten-free sandwich cookies and verify your candy melts are gluten-free. Cream cheese can be swapped for a vegan cream cheese to make the centers dairy-free, though texture will be slightly lighter; add 1–2 tablespoons of powdered sugar or a touch of coconut cream to improve binding. For coatings, melted white chocolate or tempered chocolate can be used if you prefer a different flavor and sheen.
Serving Suggestions
Arrange the truffles on a small tiered stand for a party, or plate them in mini paper cups for a neat, giftable presentation. They pair beautifully with strong coffee or tea to cut the sweetness. For a seasonal touch, serve alongside fresh berries in summer, or with warm spiced cider in cooler months. Garnish with edible gold dust for an upscale look, or drizzle contrasting colored melts over the top for a bakery-style finish.
Cultural Background
Although modern truffle balls like these are a contemporary American confection inspired by classic European chocolate truffles, they represent a hybrid of candy-making and cookie-handling techniques. Using crushed cookies with a creamy binder is a simple and approachable way to mimic ganache-style centers without tempering chocolate. Over the years this method has proliferated in home baking communities because it’s forgiving, adaptable, and scalable for holidays and fundraisers.
Seasonal Adaptations
Change the coating color and sprinkles to match holidays: pastels for Easter, red and green for Christmas, or red and pink shades for Valentine’s Day. In autumn, fold a pinch of ground cinnamon or espresso powder into the crumb mixture for warmth. For summer, substitute lemon sandwich cookies and a light lemon glaze instead of a candy shell for a bright, citrus variation that feels lighter than the classic chocolate.
Meal Prep Tips
Make the centers in a large batch and freeze them on a tray for quick dipping later; this reduces last-minute assembly to a simple dip-and-decorate step. Keep your melted coating warm in a small saucepan set over a very low heat bath or use a double boiler to maintain a fluid consistency. Label containers with the assembly date and intended serve-by date so you can rotate treats easily and avoid stale textures.
These truffles are a joy to make and share — they’re festive, forgiving, and endlessly adaptable. Whether you’re packing a small box for a neighbor or filling a platter for a shower, they always seem to disappear quickly. Try them once and you’ll have a new standby for celebrations and cozy afternoons alike.
Pro Tips
Soften cream cheese to room temperature for easy mixing and a lump-free center.
Chill rolled balls on a tray before dipping to preserve shape and reduce melting during coating.
Thin candy melts with a small amount of neutral oil for a glossy finish and easier dipping.
Work in batches and keep your melting bowl warm to prevent the coating from thickening.
Use a dipping fork and tap off excess chocolate to create neat, uniform shells.
This nourishing oreo truffle balls with pink candy coating recipe is sure to be a staple in your kitchen. Enjoy every moist, high protein slice — it is perfect for breakfast or as a wholesome snack any time.
FAQs about Recipes
Can I freeze the truffle centers before dipping?
Yes — freeze the uncoated centers on a tray until firm, then dip from frozen. Work in small batches so the coating remains fluid. After dipping, chill briefly in the refrigerator to set.
What do I do if the candy melts seize or get too thick?
If the candy coating thickens, reheat in 10–15 second microwave bursts and stir until smooth. Add a tiny bit more oil (1/2 teaspoon) if needed to restore fluidity.
How long does it take for the coating to set?
Place a small sheet pan in the fridge and chill the dipped truffles on it for 10–15 minutes; they’ll set faster in the cold environment and come out with a smooth shell.
Tags
Oreo Truffle Balls with Pink Candy Coating
This Oreo Truffle Balls with Pink Candy Coating recipe makes perfectly juicy, tender, and flavorful steak every time! Serve with potatoes and a side salad for an unforgettable dinner in under 30 minutes.
Ingredients
Oreo Truffle Filling
Coating
Decoration
Instructions
Prepare the Oreo truffle mixture
Pulse cookies into fine crumbs using a food processor, or crush in a sealed bag with a rolling pin. Combine crumbs with softened cream cheese and optional powdered sugar until a uniform dough forms.
Form and chill balls
Roll the mixture into 1-inch balls, place on parchment-lined sheet, and freeze for 20–30 minutes or refrigerate for 1 hour until firm.
Melt the candy coating
Melt candy melts with 1 tablespoon oil in a microwave-safe bowl in 30-second bursts, stirring between each until glossy and smooth. Keep warm but not hot.
Dip the truffles
Using a fork, lower each chilled ball into the coating, lift and tap off excess, then set on parchment. Immediately add sprinkles while the coating is wet.
Set and store
Refrigerate the coated truffles for 10–15 minutes to set the shell. Store in an airtight container in the fridge up to 7 days or freeze up to 3 months.
Last Step: Please leave a rating and comment letting us know how you liked this recipe! This helps our business to thrive and continue providing free, high-quality recipes for you.
Nutrition
Did You Make This?
Leave a comment & rating below or tag
@aiolirecipe on social media!
Categories:
You might also like...

Fall Harvest Pasta Salad
A cozy, colorful salad that celebrates autumn flavors — roasted butternut squash and Brussels sprouts tossed with pasta, cranberries, pecans, and tangy feta, finished with a balsamic vinaigrette.

Cilantro Lime Steak Bowls
Bright, tangy cilantro-lime marinated flank steak served over rice with black beans, corn, fresh veggies and creamy avocado for a fast, healthy weeknight bowl.

Pecan Pie Crescent Rolls
Buttery crescent rolls filled with a sweet pecan pie–inspired filling — a quick, crowd-pleasing dessert perfect for holidays or weeknight cravings.
Did You Make This?
Leave a comment & rating below or tag @aiolirecipe on social media!
Rate This Recipe
Share This Recipe
Enjoyed this recipe? Share it with friends and family, and don't forget to leave a review!
Comments (1)
This recipe looks amazing! Can't wait to try it.
Comments are stored locally in your browser. Server comments are displayed alongside your local comments.
Hi, I'm Olivia!
What's Popular

30-Minute Meals!
Join to receive our email series which contains a round-up of some of our quick and easy family favorite recipes.